
A dull drill bit is a workshop’s silent productivity killer. It forces you to lean harder, burns the wood, and leaves rough, inaccurate holes. Sharpening your own drill bits at home saves money, extends tool life, and gives you cleaner results every time. With the right techniques and a few essential tools, you can restore a worn bit to factory‑sharp condition in minutes.
Your workshop setup makes a big difference. A reliable air compressor, for example, doubles as a cleaning station for debris and dust during sharpening. The CRAFTSMAN Air Compressor, 2 Gallon Portable offers 125 PSI and a lightweight design that fits any bench. After grinding your bit, a quick blast of compressed air clears the wheel’s residue and cools the metal—a step many DIYers skip.

Understanding Drill Bit Geometry
Before you touch a grinder, you need to understand what makes a drill bit cut effectively. The three main angles are:
- Point angle – Most twist bits use 118° (general purpose) or 135° (harder materials, self‑centering).
- Lip relief angle – The clearance behind the cutting edge; typically 12–15°.
- Chisel edge – The center point; a dull or overly wide chisel edge causes wandering.
Different bit types require slightly different sharpening approaches. High‑speed steel (HSS) bits are the easiest to sharpen. Carbide bits are extremely hard and demand diamond wheels or specialized sharpeners. Masonry and spade bits are better replaced than sharpened, though you can touch up spade bits with a file.
Signs Your Drill Bit Needs Sharpening
Don’t wait until the bit is smoking. Watch for these clues:
- Burn marks on the workpiece – The friction from a dull bit scorches wood or discolors metal.
- Excessive pressure – You have to push harder than usual to get through the material.
- Wandering – The bit skates across the surface instead of starting cleanly.
- Rough or oversized holes – A dull bit tears fibers instead of cutting them.
- Squealing or high‑pitched noise – This indicates the cutting edges are scraping rather than slicing.
If you notice any of these, it’s time to sharpen.
Essential Tools for Sharpening Drill Bits
You don’t need a full machine shop. Most home sharpeners use one of these tools:
- Bench grinder – Fast and effective; the go‑to for HSS bits.
- Drill bit sharpener – Purpose‑built jigs (like Drill Doctor) remove guesswork.
- Dremel or rotary tool – Great for small bits and field touch‑ups.
- File – Low‑tech but works for emergency sharpening.
- Angle grinder with a flap disc – Only for extreme cases; easy to overheat.
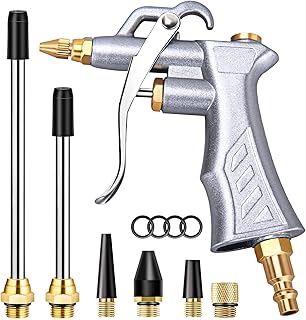
Pro tip: After sharpening, clean dust and metal filings from the bit flutes with compressed air. A JASTIND Industrial Air Blow Gun attaches to any compressor and delivers a powerful, adjustable stream. It’s indispensable for keeping your work area and tools free of debris.
Step‑by‑Step Methods
Using a Bench Grinder
This is the classic method, used by machinists for decades. You’ll need a grinder with a medium‑grit wheel (60–80 grit) and a steady hand.
-
Set up a guide – If your grinder doesn’t have a tool rest, clamp a piece of angle iron or wood at the correct angle. Most 118° bits need a 59° angle from the centerline.
-
Cool the bit – Keep a cup of water nearby. Dip the bit after every two seconds of grinding to prevent overheating (which ruins the temper).
-
Grind the first lip – Hold the bit so it contacts the wheel exactly at the cutting edge. Rotate the bit slightly (about 12–15°) to create the lip relief. Do not press hard; let the wheel do the work.
-
Grind the second lip – Flip the bit 180° and repeat the exact same motion. The two lips must be identical in length and angle.
-
Test the point – A properly sharpened bit should have a symmetrical point. Use a drill bit gauge or simply drill into scrap wood to check for wobble.
Common mistake: Grinding one lip longer than the other. This causes oversize holes and excessive vibration. Always count your passes—same number, same pressure.
Using a Drill Bit Sharpener
If you sharpen bits frequently, a dedicated sharpener like a Drill Doctor saves time and eliminates errors. These machines automatically align the bit and grind both lips at the correct angle.
- Insert the bit into the appropriate collet.
- Place the collet in the sharpener and turn on the wheel.
- Rotate the bit as instructed (usually one full turn) to grind both lips evenly.
- Remove and inspect. Some models have a finishing wheel for the chisel edge.
Drill bit sharpeners work best for standard twist bits. They are less effective for specialty bits like Forstner or countersinks.
Using a Dremel or Rotary Tool
For small bits (1/8″ or smaller) that are hard to hold, a Dremel with a small grinding stone is a good alternative.
- Secure the bit in a vise or pin vise.
- Use a diamond or aluminum oxide stone.
- Lightly touch the lip at the correct angle, rotating the bit to match the factory bevel.
- Work slowly and dip the bit in water frequently.
This method is slow but gives you fine control for tiny bits where a bench grinder would be too aggressive.
Using a File
No power tools? A fine metal file can restore a twist bit in a pinch. This works best for bits that are only slightly dull.
- Clamp the bit vertically in a vise, with the cutting edge facing up.
- File the lip at the same 59° angle, using short, even strokes.
- Keep the file flat on the bevel; don’t rock it.
- After each stroke, check the symmetry. Flip and repeat for the other lip.
Filing takes longer but is quiet, dust‑free, and safe. It’s also a good way to learn the correct angle without the risk of overheating.
Using an Angle Grinder with a Dressing Stone
This is an emergency method. Only do this if you have no other option—angle grinders are aggressive and easily overheat metal.
- Fit a flap disc or a diamond wheel to the grinder.
- Hold the bit with pliers and lightly touch the cutting edge to the disc.
- Use a very light touch; keep the bit moving.
- Dip in water every two seconds.
Most DIYers find this method too imprecise. Stick to a bench grinder or sharpener for consistent results.
Common Mistakes to Avoid
- Overheating the bit – Blue or black colors on the cutting edges indicate the temper is ruined. The bit will become soft and won’t hold an edge. Use water frequently.
- Grinding the wrong angle – A 135° bit sharpened at 118° will lose its self‑centering ability. Check the factory angle before you start.
- Creating an asymmetrical point – The two lips must be the same length. Use a gauge or measure with calipers.
- Removing too much material – You only need to remove a few thousandths of an inch to refresh the cutting edge. Grinding away the entire lip shortens the bit.
- Neglecting the chisel edge – A sharp but wide chisel edge still causes wandering. Thin it slightly with the corner of the wheel.
Maintaining Your Drill Bits After Sharpening
Sharpening is only half the battle. Proper storage and routine care keep your bits sharp longer.
- Store bits in a dry case or roll – Moisture causes rust, which dulls edges.
- Lubricate when drilling metal – Use cutting oil or wax to reduce heat.
- Clean after use – Blow out sawdust and metal filings from the flutes. A quick blast from your air compressor blow gun prevents buildup in the cutting grooves.
- Use a drill bit sharpener regularly – Don’t wait until bits are completely dull. A light touch‑up every few jobs extends their life.
When to Replace Instead of Sharpen
Some bits are not worth saving. Consider replacement when:
- The bit has a crack or chip larger than 1/32″.
- The cutting edges are too short (less than 1/4″ of usable length).
- The shank is bent or damaged.
- It’s a carbide‑tipped bit and you don’t have diamond sharpening equipment.
- The bit is masonry or glass‑specific – these often have unique geometries that home sharpening can’t replicate.
Cheap bit sets are often inexpensive enough that replacement is more practical than sharpening. But for high‑quality HSS bits, sharpening adds years of service.
Advanced Tips for Precision Sharpening
For those who demand perfection, consider these pro techniques:
- Use a drill point gauge – These inexpensive tools let you check the point angle and lip length in seconds.
- Sharpen the split point – Many modern bits have a split point (a secondary notch at the chisel). You can replicate this with a thin grinding wheel to improve drilling accuracy.
- Use a drip‑cooling system – Instead of dipping, some workshop setups run a slow drip of water onto the grinding wheel to keep the bit cool continuously.
- Hone the lips – After grinding, lightly hone the cutting edges with a fine diamond stone to remove burrs.
Workshop Setup for Drill Bit Maintenance
A dedicated sharpening station makes the process consistent and reduces setup time. Here’s what you need:
- Bench grinder with a coarse and fine wheel.
- Drill bit sharpener (optional but recommended for high volume).
- Air compressor for cleaning bits and cooling the grinding area. A DEWALT Pancake Air Compressor, 6 Gallon, 165 PSI provides ample air for blow guns and lightweight pneumatic tools. Its oil‑free pump requires minimal maintenance—ideal for a home garage.

- Vise or clamp to hold the bit steady.
- Safety glasses and a dust mask (grinding dust is harmful).
- Lighting – good visibility prevents asymmetry.
For more on setting up your workspace, see our guide on Setting Up Your First Workshop: Tools Every Beginner Needs.
Frequently Asked Questions
Q: Can I sharpen carbide drill bits at home?
A: Yes, but you need a diamond grinding wheel or a dedicated sharpener with diamond abrasives. Regular aluminum oxide wheels won’t touch carbide. Even then, sharpening carbide is brittle and tricky—many professionals recommend replacement.
Q: How often should I sharpen drill bits?
A: After every 20–50 holes in wood, or after 5–10 holes in metal, depending on material hardness. Sharpen at the first sign of burning or wandering.
Q: Does sharpening affect the drill bit’s hardness?
A: Only if you overheat it. Keep the bit cool with water dips or a drip system, and the original hardness remains.
Q: What’s the easiest sharpening method for beginners?
A: A dedicated drill bit sharpener like the Drill Doctor. It automates the alignment and grinding, giving consistent results with almost no practice.
Q: Can I use a file on masonry bits?
A: No. Masonry bits have a carbide tip that can’t be filed. Use a diamond wheel or replace the bit.
Final Thoughts
Sharpening drill bits at home is a satisfying skill that saves money and improves your work quality. Whether you use a bench grinder, a dedicated sharpener, or even a file, the key is maintaining the correct geometry and avoiding heat buildup. Pair your sharpening station with a reliable air compressor for cleaning and cooling—it makes the whole process faster and more comfortable.
Remember the CRAFTSMAN V20 Tire Inflator for portable inflation tasks, but for stationary workshop sharpening, a 2‑gallon or 6‑gallon compressor handles blow guns and light air tools perfectly. Keep your bits sharp, your compressor ready, and your projects running smoothly.
For more maintenance wisdom, read our Air Compressor Maintenance Schedule: A Monthly Checklist and learn why a well‑kept compressor supports every tool in your garage.