
Building your own workbench is the single best upgrade you can make for your home garage or workshop. You don’t need years of carpentry experience or a giant budget. With a solid plan, the right power tools, and a reliable air compressor, you can go from a pile of lumber to a fully functional workbench in just two days.
This guide walks you through every step, from choosing the perfect dimensions to assembling the frame and adding features like a pegboard and air hose reel. We’ll also highlight the essential air compressors and power tools that make the job fast, precise, and fun. Let’s dive in.
Plan Your Workbench: Size, Strength, and Style
Before you touch a single saw blade, take time to plan. A well-thought-out workbench saves you from wasted materials and frustration halfway through the build.
Determine the Right Dimensions
Most garage workbenches are 30 to 36 inches deep, 60 to 96 inches wide, and 36 to 40 inches high. Your optimal height depends on your own comfort. A common rule: stand with your arms at your sides and bend your elbows 90 degrees. The distance from the floor to your palm is your ideal workbench height.
- Depth: 30” is a sweet spot—deep enough for most projects but not so deep that you can’t reach the back.
- Width: 72” (6 feet) gives you enough space for a large project while fitting in most two-car garages.
- Height: 36” works for most people. If you’re tall, consider 38”.
Choose a Design Style
Three fundamental designs dominate workshop builds:
- Simple 2×4 frame with plywood top – fastest and cheapest.
- Heavy-duty torsion box top – incredibly flat and strong for fine woodworking.
- Metal-frame with butcher block – industrial look, very stable.
For a weekend build, the 2×4 frame with ¾-inch plywood top is the most realistic choice. You can upgrade later.
Location Matters
Place your workbench against a wall that has easy access to power outlets and lighting. If you plan to use air tools frequently, keep the bench near your air compressor to minimize hose length. Also check that the floor is level—shim the legs if needed.
Materials and Tools: What You Need Before You Start
A clear list prevents multiple trips to the hardware store. Here’s exactly what you’ll need for a standard 72” x 30” x 36” workbench.
Lumber and Hardware
| Item | Quantity | Notes |
|---|---|---|
| 2×4 x 8’ studs | 10–12 | Choose straight, kiln-dried lumber |
| ¾” plywood (4×8 sheet) | 1 | For the top |
| ½” plywood (4×8 sheet) | 1 | For shelves |
| 2 ½” deck screws | 1 box | For framing joints |
| 1 ¼” pocket screws | 1 box | If using pocket holes |
| Wood glue | 1 bottle | Adds joint strength |
| Optional: 3” lag bolts | 8 | For fastening top to frame |
| Optional: casters | 4 | Makes bench portable |
Must-Have Power Tools
- Circular saw or miter saw – for cutting 2x4s to length.
- Drill/driver – for driving screws. A cordless drill with a high-torque setting is ideal.
- Air compressor – speeds up assembly and cleans dust. We’ll look at top picks below.
A pocket hole jig (like Kreg) is optional but makes joining the frame much faster. If you own an impact driver and a compact air compressor, you’ll cut build time by hours.
Essential Air Tools for Building
These air-powered accessories make weekend builds much more efficient:
- Air blow gun – clears sawdust from cuts and joints instantly.
- Air hammer with chisel – great for quick demolition if you’re modifying an existing space.
- Air ratchet – speeds up tightening bolts on leg brackets.
Power Tools and Air Compressors: What You Really Need
Choosing the right air compressor for your workbench build isn’t complicated. You need enough CFM (cubic feet per minute) to run your brad nailer or impact wrench, plus a tank size that doesn’t cycle on every five seconds.
Top Air Compressors for the Weekend Builder
The following models are proven performers. Let’s break down each one.

CRAFTSMAN 2-Gallon Air Compressor – $129.99, ★4.0
Best for light-duty brad nailing and inflating. Its small size tucks under a bench, and the 125 PSI max is enough for most trim work. The 10-piece accessory kit gives you blow guns, adapters, and inflation tips right out of the box.
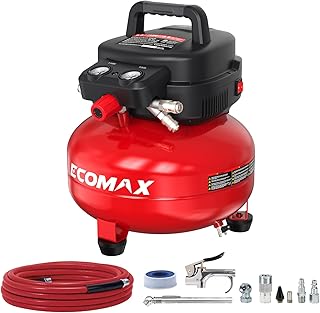
ECOMAX 6-Gallon Pancake Compressor – $169.99, ★4.7
This pancake-style unit delivers 150 PSI and a 2.6 CFM at 90 PSI. It’s oil-free, quiet enough for indoor use, and comes with a kit of 10 accessories. It’s an excellent choice if you’ll also use it for pneumatic tools like an impact wrench.

DEWALT DWFP55126 6-Gallon Pancake Compressor – $204.99, ★4.6
Rated at 165 PSI, this DEWALT handles framing nailers and grinders without struggling. It has a high-flow regulator and a durable oil-free pump. Pair it with the DYNAMIC POWER 50-Piece Air Tool Kit ($99.99, ★4.4) for a complete workshop setup.

PORTER-CABLE C2002-ECOM 6-Gallon Pancake – $164.00, ★4.6
A staple in garages across the country. It’s light (30 lbs), oil-free, and delivers 2.6 CFM at 90 PSI. The built-in storage lets you wrap the hose and power cord neatly.
If you prefer cordless convenience, consider the DEWALT 20V Tire Inflator ($130.22, ★4.6) for inflating tires after moving heavy tools—use it with a 20V battery already in your DEWALT ecosystem.
Why You Should Use an Air Blow Gun During Assembly
Sawdust collects on glue joints and inside screw holes. One blast from the JASTIND Industrial Air Blow Gun ($11.99, ★4.6) or the High Volume Extensible Blow Gun ($12.99, ★4.6) cleans your work area instantly. This improves glue adhesion and prevents screw stripping.
Cordless Option for Tight Spaces
The CRAFTSMAN V20 Cordless Tire Inflator ($39.00, ★4.6) is incredibly portable. It won’t run a nailer, but it’s perfect for keeping your workshop caster tires topped up. The CRAFTSMAN V20 Multi-Mode Inflator ($49.00, ★4.4) adds a 120V corded mode so you never run out of battery mid-job.
Step-by-Step Build: From Cutting to Assembly
Now let’s build. Set aside Saturday for cutting and Sunday for assembly and finishing. A helper makes the job go twice as fast.
Step 1: Cut All 2x4s to Length
Using a miter saw or circular saw, cut the following pieces for a 72” x 30” x 36” bench:
- Legs (4): 35 ½” each. (Workbench height 36” minus ¾” plywood top = 35 ¼”, plus a smidge for leveling.)
- Top frame long sides (2): 72” each.
- Top frame short sides (2): 28 ½” each. (Because you subtract the thickness of two 2x4s: 30” – 3” = 27”? Wait, a 2×4 is 1.5” thick, so two of them are 3”. So short sides: 30” – 3” = 27”.) Be precise: 30” depth minus 1.5” (front 2×4) minus 1.5” (back 2×4) = 27” for short crosspieces.
- Lower shelf frame long sides (2): 72” each.
- Lower shelf frame short sides (2): 27” each.
- Cross braces for legs (4): 22 ½” each. (To fit between legs.)
Cut slowly and use a speed square. Measure twice—yes, twice.
Step 2: Build the Leg Assemblies
Each pair of legs needs a cross brace to prevent wobbling. On a flat surface, lay two legs parallel, 22 ½” apart. Attach the cross brace between them using 2 ½” deck screws and wood glue. Make sure it’s square. Repeat for the second pair.
Step 3: Assemble the Top Frame
Join the two 72” pieces (long sides) with the two 27” pieces (short sides) to form a rectangle. Use pocket screws or butt joints with screws from the outside. Clamp each corner before driving screws. This frame will support your plywood top.
Step 4: Attach Legs to Top Frame
Stand the leg assemblies upright and position the top frame on top of them. The legs should sit flush inside the frame corners. Drive screws through the frame into the legs—two per connection. Use a level to check the frame is square and the legs are plumb.
Step 5: Build the Lower Shelf Frame
Repeat the same rectangle construction using the two 72” pieces and two 27” pieces for the shelf frame. This frame will sit about 6” off the floor. Attach it to the legs at the desired height with screws.
Step 6: Install the Plywood Top and Shelf
Cut your ¾” plywood to 72” x 30” with a circular saw. Place it on the top frame and screw through the plywood into the frame every 12 inches. Countersink the screws slightly. For the shelf, cut the ½” plywood to the same dimensions and screw it onto the lower shelf frame.
Step 7: Add Extra Bracing (Optional)
For heavy-duty use, attach diagonal 2×4 braces from the legs to the top frame. This eliminates any side-to-side racking. Use triangle gussets or long screws.
Congratulations—you have a workbench! Now make it yours.
Pro Features to Add in the Same Weekend
You have Sunday afternoon left. These upgrades take a few hours each.
Pegboard Back Panel
Pegboard vs slatwall is a personal choice. For a quick install, screw a 4×8 sheet of pegboard to the wall behind the bench. Use 1” standoff spacers to create airflow. Add hooks and bins for tool storage.
Power Strip and Lighting
Mount a 6-outlet power strip under the front edge of the bench. Use cord clips to route cables. For lighting, install a row of LED shop lights above the bench. Proper lighting a workshop reduces eye strain and improves cut accuracy.
Air Hose Reel
Mount a small air hose reel under the bench. Connect it to your air compressor with a quick-disconnect fitting. This keeps the hose off the floor and extends its reach. If you’re using a pancake compressor, make sure the reel doesn’t create too much back pressure.
Drawers or Cabinet Below
If you have leftover plywood, build a simple drawer box under the shelf. Full-extension drawer slides make it easy to access tools. This is a half-day project you can start next weekend.
Finishing the Workbench: Protect Your Investment
Plywood absorbs oil and sweat. A coat of polyurethane or Danish oil seals the surface and makes cleanup simple.
- Option 1: Water-based polyurethane – dries clear, low odor.
- Option 2: Danish oil – penetrating finish, easy to touch up.
- Option 3: Paint – high-gloss enamel resists chemicals.
Apply two thin coats, sanding lightly between coats with 220-grit paper. Use the High Volume Air Blow Gun to blow dust off between coats.
Expert Tips for a Smooth Weekend Build
- Pre-cut all lumber at the store. Many home centers cut free. Have them rough-cut 2x4s to 8-foot lengths, then you do final cuts at home.
- Use an impact driver, not a drill. The impact driver drives screws faster without stripping. Keep a cordless drill for pilot holes.
- Clamp before screwing. Always clamp joints to prevent shifting.
- Check for square after every assembly step. A large framing square is worth every penny.
- Level the bench after assembly. Shim under the legs if the floor is uneven. An unlevel bench is frustrating for precision work.
- Add a vice later. You don’t need it for the build, but mounting a mechanics vise or woodworking vise on the front edge greatly expands the bench’s utility. Drill mounting holes before you finish the top.
Troubleshooting Common Problems
If your air compressor keeps tripping the breaker, read Why Your Air Compressor Keeps Tripping the Breaker (And What to Do). If you’re unsure about oil-free vs oil-lubricated, check Oil-Free vs Oil-Lubricated Air Compressors. For maintenance, follow the Air Compressor Maintenance Schedule.
Conclusion: You Built a Workbench in a Weekend
You now have a rock-solid workbench built with your own hands. It’s the centerpiece of your growing workshop. The skills you learned—measuring, cutting, framing, fastening—apply to countless future projects. And with the right air compressor and power tools, you’ll tackle those projects faster and safer.
Start with a reliable compressor like the PORTER-CABLE 6-Gallon or the ECOMAX 6-Gallon, and you’ll have air power for everything from framing to finishing.
Now take a step back, admire your workbench, and plan your next project. Build a set of shelves, a tool cabinet, or a miter saw station. Your workshop is only getting better from here.