
Floating shelves look clean and modern, but most store-bought versions can barely hold a few paperbacks. If you want shelves that support heavy books, kitchen appliances, or even a small TV, you need to build them yourself with the right materials and tools. The secret lies in understanding load distribution, using proper fasteners, and employing power tools that give you precision and strength.
This guide covers every aspect of building heavy-duty floating shelves—from selecting hardwoods to choosing the best air compressor for powering your nailers and cleaning up sawdust. We’ll also walk through the exact mounting techniques that prevent sagging or catastrophic failure. By the end, you’ll have shelves that look like floating art and function like industrial storage.
Why Most Floating Shelves Fail
The typical floating shelf relies on a few small screws driven into drywall anchors. That works for a single photo frame, but add a stack of hardcovers and the shelf will pull away from the wall. The problem is twofold: weak mounting hardware and thin shelf material.
Common failure points include:
- Drywall anchors that can’t support more than 20–30 pounds per anchor
- Shelves made from particleboard or MDF, which crumble under sustained weight
- Hidden brackets that are too short to distribute load to studs
- Over-tightening screws that strip out the shelf material
Avoiding these issues requires a shift in approach. You need a shelf that is structurally integrated with the wall, not just attached to it.
Materials That Make a Difference
Not all wood is equal when it comes to bearing loads. For floating shelves that hold real weight, choose materials with high density and structural integrity.
Best material choices (ranked by load capacity):
- Solid hardwood (oak, maple, walnut) – extremely strong, but heavy and expensive
- Baltic birch plywood – excellent strength-to-weight ratio, less prone to warping
- High-grade softwood (Douglas fir, cedar) – affordable, but requires thicker dimensions
- Avoid at all costs: particleboard, MDF, pine from big-box stores (unless it’s thick hardwood plywood)
Thickness matters. A 1-inch thick shelf can hold roughly twice the weight of a ¾-inch shelf of the same material. For a shelf spanning 36 inches, aim for at least 1 inch thick hardwood or ¾-inch Baltic birch with a solid wood edge band.
The Anatomy of a Heavy-Duty Floating Shelf
A strong floating shelf is not just a slab of wood. It’s a box or frame that transfers weight back to the wall through hidden supports.
Three critical components:
- The shelf body – typically a hollow or solid core that hides the mounting mechanism
- The support cleat – a steel or hardwood bracket that attaches to wall studs
- The fastening system – heavy-duty screws, lag bolts, or threaded rods that connect the shelf to the cleat
For many DIYers, the cleat system is the most reliable. A 2×4 or 2×6 cleat is screwed into at least two studs using lag bolts, then the shelf slides over the cleat and is secured with pocket screws or an integrated dovetail. This method can support hundreds of pounds if executed correctly.
Power Tools & Compressors to Get the Job Done
Building floating shelves that hold weight demands precision cuts, strong joints, and secure fastening. While a cordless drill can handle basic tasks, an air compressor paired with pneumatic tools will elevate your build quality and speed.
Choosing the Right Air Compressor
Not all compressors are suited for woodworking. You need one that delivers enough pressure (at least 90–120 PSI) and has a tank large enough to keep up with a brad nailer or stapler without constant cycling.
| Model | Tank Size | Max PSI | Rating | Best For |
|---|---|---|---|---|
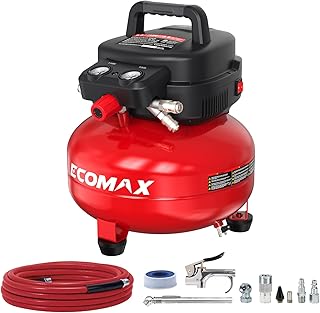
| ECOMAX 6 Gallon Pancake | 6 gal | 150 PSI | 4.7/5 | Brad nailer, stapler, blow gun |
| PORTER-CABLE C2002-ECOM | 6 gal | 150 PSI | 4.6/5 | Same, plus light framing |
| DEWALT DWFP55126 | 6 gal | 165 PSI | 4.6/5 | Higher capacity for continuous use |
| CRAFTSMAN 2 Gallon Portable | 2 gal | 125 PSI | 4.0/5 | Small jobs, occasional nailing |
For building multiple shelves, a 6-gallon pancake compressor like the PORTER-CABLE C2002-ECOM or DEWALT DWFP55126 is ideal. These models are oil-free, lightweight, and quiet enough for indoor use. The CRAFTSMAN 2 gallon is fine if you are only building one shelf, but the smaller tank may cause the motor to run constantly during back-to-back nailing.
Essential Air Tools for Shelf Building
A pneumatic brad nailer or finish nailer is the star of the show. It drives 18-gauge or 16-gauge nails cleanly into hardwood without splitting, and leaves a small hole that’s easy to fill. Combined with a compressor, you can attach face frames, cleats, and trim in seconds.
Tool recommendations based on the real data:
- Air blow gun – the JASTIND Industrial Air Blow Gun (rated 4.6) is perfect for clearing sawdust from your workspace. Keeping a clean shop prevents debris from interfering with glue joints and finishes.
- Air tool kit – the DYNAMIC POWER 50-Piece Air Tool Kit includes an impact wrench, ratchet, and air hammer. While not essential for shelves, the impact wrench can speed up driving lag bolts into studs for heavy-duty support brackets.

Note: If you don’t have a compressor yet, start with a PORTER-CABLE C2002-ECOM – it’s a workhorse that pairs well with any pneumatic nailer. For cleaning, the High Volume Blow Gun with extendable nozzle (also 4.6 rating) helps reach tight spaces inside the shelf cavity.
Step-by-Step Building Process
Let’s walk through constructing a 36-inch long floating shelf from solid oak that can hold over 100 pounds.
1. Cut the Shelf Blank
Rip a piece of 8/4 (2-inch thick) oak to 10 inches wide and 36 inches long. This will be your shelf top. For the front and side edges, use 1-inch thick oak strips, mitered at 45-degree corners.
Tools needed:
- Circular saw or table saw (reference Miter Saw vs Table Saw for best cuts)
- Brad nailer powered by your compressor
2. Build the Support Cleat
Cut a 2×4 to 30 inches long – slightly shorter than the shelf interior. Drill two pilot holes and counterbore for ½-inch lag bolts. Position the cleat so it spans at least two wall studs.
Pro tip: Use the DEWALT 20V Inflator (yes, it’s a tire inflator, but its digital pressure gauge helps set consistent torque on your impact driver – or just use it to inflate tires afterward). For the cleat, a pneumatic impact wrench from the DYNAMIC POWER kit can drive lag bolts quickly, but a cordless impact driver works fine too.
3. Assemble the Shelf Box
Glue and nail the front and side strips to the shelf top. Let the glue cure for at least 4 hours. This creates a U-shaped channel that hides the cleat.
4. Attach the Cleat to the Wall
Locate studs with a stud finder. Drill 3/8-inch pilot holes through the cleat into the studs. Drive ½-inch lag bolts with a washer. Use a level to ensure the cleat is perfectly horizontal.
5. Slide the Shelf Over the Cleat
Apply glue to the top of the cleat, then slide the shelf box onto it. Secure the shelf from below using 2-inch screws driven at an upward angle into the cleat. A pneumatic finish nailer from a CRAFTSMAN 2-gallon compressor works well for temporary hold while the glue sets.
6. Fill and Finish
Fill nail holes with wood putty, sand to 220 grit, and apply your chosen finish. For heavy shelves, a polyurethane top coat adds durability.
Mounting for Maximum Strength
The mounting method determines the shelf’s true weight capacity. There are three approaches, ranked by reliability:
| Method | Load Capacity | Complexity |
|---|---|---|
| Lag bolt cleat (into studs) | Up to 300 lbs | Medium |
| Steel bracket + toggle bolts | 100–150 lbs | Low |
| Threaded rod through shelf | 200+ lbs (into studs) | High |
For most applications, the lag bolt cleat is the best balance of strength and difficulty. Spread the load across at least two studs. If your studs are 16 inches on center, a 30-inch cleat will catch both.
What about drywall-only installations? You can’t safely hold more than 50 pounds on floating shelves without hitting studs. In that case, use heavy-duty toggle bolts rated for 100+ pounds each (but that’s per bolt, and you need two per shelf).
Pro Tips & Common Mistakes
Tip 1: Pre-drill everything. Hardwoods split easily. Always drill pilot holes for screws and lag bolts – especially near edges.
Tip 2: Use a blow gun to clean out dust before gluing. The JASTIND Industrial Air Blow Gun with brass airflow nozzle (4.6 rating) is perfect for this. Dust prevents wood glue from bonding properly, weakening joints.
Tip 3: Reinforce corners with glue blocks. Glue small wooden triangles inside the shelf corners. This prevents the shelf from racking (twisting) under heavy loads.
Common mistake: Not accounting for shelf sag over long spans. A 48-inch shelf made from ¾-inch material will sag noticeably under 50 pounds. For spans over 24 inches, bump up to 1-inch thick material or add a hidden steel channel.
Integrating Your Compressor into the Workshop
If you are serious about building furniture, an air compressor should be a central part of your workshop. The ECOMAX 6-gallon is quiet enough for indoor use and can power a brad nailer, stapler, and blow gun simultaneously with its 150 PSI max. Learn more about compressor sizing in How to Choose the Right Air Compressor Size for a Home Garage.
Oil-free vs oil-lubricated? The compressors listed here are oil-free, which means less maintenance and no oil mist in your shop. For longer tool life, see Oil-Free vs Oil-Lubricated Air Compressors: Which One Fits Your Workshop.
Final Thoughts
Building floating shelves that hold weight is entirely achievable with the right approach. Focus on a solid cleat mount, thick hardwood, and quality pneumatic tools to speed up assembly. An air compressor like the PORTER-CABLE C2002-ECOM will pay for itself after your first few projects, and the DEWALT pancake compressor offers extra PSI for continuous nailing.
Related resources:
- Pancake, Hot Dog, and Twin Stack Compressors Explained
- How to Build a Workbench in a Weekend
- How to Hang Heavy Mirrors on Drywall and Plaster
- Dust Collection for Small Workshops: A Practical Setup
Now grab your compressor, load up a finish nailer, and start building shelves that actually live up to the name “floating.” Your books—and your walls—will thank you.