
Few home improvement tasks deliver as much instant gratification as a fresh coat of paint. Yet many DIYers waste hours—sometimes entire weekends—simply because they follow the wrong sequence. Painting a room isn’t just about brushstrokes; it’s about workflow. The order you prep, prime, cut in, and roll directly determines whether you finish in four hours or four days.
What does this have to do with compressors and power tools? A lot. Modern air compressors can dramatically accelerate the tedious parts of painting: cleaning dust from surfaces, powering sanders, and even spraying paint. By pairing the right compressor with a smart painting order, you cut both time and fatigue. Below, we’ll walk through the exact sequence that saves you hours, and I’ll show you exactly which tools—including top-rated compressors like the CRAFTSMAN Air Compressor, 2 Gallon (ASIN B0DLKSR6LD)—make the job effortless.

Why the Right Order Matters More Than the Paint Brand
Painting is a linear process: each step depends on the one before. If you patch holes after priming, you sand off the primer. If you tape trim after rolling, you risk peeling wet paint. The classic mistake is “ready, fire, aim”—starting in the middle and backtracking. A disciplined order eliminates rework.
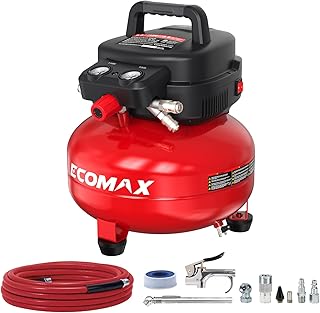
But even the best sequence isn’t enough without the right gear. Compressed air tools can turn hours of manual sanding and dusting into minutes. For example, an ECOMAX Air Compressor 6 Gallon (ASIN B0D7322DB2) paired with a blow gun clears every crevice in seconds.
Below is the step-by-step order I’ve refined over dozens of room repaints. Stick to it, and you’ll save at least 30% of your usual time.
Step 1: Clear and Protect the Room (15–30 Minutes)
Move furniture to the center and cover with drop cloths. Remove outlet covers, switch plates, and light fixtures. Use painter’s tape to mask baseboards, window casings, and ceiling edges.
Here’s where an air compressor shines before you even open a paint can: blow dust out of every corner with an JASTIND Industrial Air Blow Gun (ASIN B07GJQJJMQ). This step alone prevents dust from embedding into wet paint later.
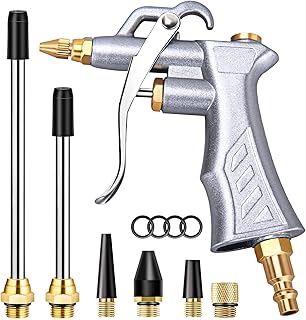
Pro tip: Use a high-volume blow gun with a 360-degree swivel to reach behind radiators and under window sills.
Step 2: Repair and Sand Surfaces (30–60 Minutes)
Fill nail holes, dents, and cracks with spackle. While it dries, sand any glossy areas or previous paint drips. Manual sanding dulls your elbows and takes forever. Instead, attach an orbital sander to a pancake compressor like the PORTER-CABLE Air Compressor, 6-Gallon, Oil-Free (ASIN B09BXYP2R9).

Pneumatic sanders are lighter and cause less vibration than electric models. The PORTER-CABLE C2002 delivers 6 gallons at 150 PSI—enough to run a DA sander continuously for 30 minutes. That’s more than enough to scuff-sand an entire room.
After sanding, vacuum the walls and then blow everything clean with compressed air. Use an High Volume Powerful Industrial Air Blow Gun (ASIN B07DQJDZNR) to reach high corners.

Step 3: Prime the Walls and Ceiling (45–60 Minutes)
Priming seals the drywall, evens out absorption, and hides old colors. Use a stain-blocking primer if you’re covering dark paint or water stains.
Roll the ceiling first, then the walls. Cut in around edges with a brush. Keep a wet edge to avoid lap marks. Don’t skip this step—even if you’re using paint-and-primer-in-one, a dedicated primer halves the number of finish coats.
While the primer dries, use the downtime to clean your compressor tank. See our Air Compressor Maintenance Schedule: A Monthly Checklist for best practices.
Step 4: Cut in the Trim and Ceiling Lines (30–45 Minutes)
Once primer is dry, cut in a 2–3 inch band around the ceiling, corners, and baseboards. Use a high-quality angled sash brush. This is the most critical step for crisp lines. Tape helps, but a steady hand is better.
If you have an airless sprayer connected to a compressor, you can speed up cutting in by using a small tip. But for most DIYers, a brush is still faster than masking everything.
Step 5: Roll the First Coat (30–60 Minutes per Coat)
Roll the walls in a W pattern, then fill in without lifting the roller. Work from top to bottom, one wall at a time. Keep a wet edge—don’t let a section dry before you overlap it.
Consider using a DEWALT Pancake Air Compressor, 6 Gallon, 165 PSI (ASIN B00K34UZBW) to run a pneumatic paint sprayer if you’re painting multiple rooms. The extra PSI ensures consistent atomization.

Step 6: Second Coat (30–60 Minutes)
After the first coat dries (check the label—usually 2–4 hours), apply the second coat using the same technique. This is where you’ll see if your order worked. If you cut in before rolling, the finish should be uniform with no roller marks near edges.
Step 7: Remove Tape and Clean Up (15–30 Minutes)
Peel painter’s tape while the second coat is still slightly tacky—this prevents paint from tearing. Use a utility knife to score edges if needed.
Clean your tools immediately. Latex paint washes out with soap and water, but dried paint ruins brushes. For air tools, blow out any residual paint from sprayers using your compressor. The CRAFTSMAN V20 Tire Inflator Portabl isn’t just for tires—it’s handy for blowing out air tool fittings.

How Compressors and Power Tools Accelerate Each Stage
Many DIYers underestimate the time penalty of manual prep. The table below compares traditional methods with compressed air alternatives:
| Task | Traditional Method | Time | With Air Compressor (plus tool) | Time Saved |
|---|---|---|---|---|
| Dust removal | Tack cloth, vacuum | 20 min | Blow gun (e.g., JASTIND) | ~15 min |
| Sanding | Sanding block | 60 min | Pneumatic DA sander + compressor | ~40 min |
| Cleaning crevices | Rag wrapped on stick | 15 min | Extendable blow gun | ~12 min |
| Paint application | Roller only | 45 min/coat | Airless sprayer + compressor | ~20 min/coat |
For small rooms, a 2-gallon compressor like the CRAFTSMAN 2 Gallon (ASIN B0DLKSR6LD) is ample. For larger projects, step up to the DEWALT 6 Gallon (ASIN B00K34UZBW) for longer runtimes.
Choosing the Right Compressor for Painting Prep
Not every compressor is ideal for painting support. Here are the key specs to look for:
- CFM at 90 PSI – For a DA sander, you need at least 4–5 CFM. Most small pancake compressors deliver 2.6–3 CFM, which works for intermittent sanding.
- Tank size – 6 gallons gives you a 30–40 second run time before the pump kicks in. That’s usually enough to finish a wall section.
- Noise level – Oil-free compressors are louder. If you’re painting indoors, consider a quiet model (see The Best Quiet Air Compressors for Indoor Use).
Best all-around painting prep compressor: the PORTER-CABLE C2002-ECOM (ASIN B09BXYP2R9). It’s oil-free, lightweight (30 lbs), and delivers 2.6 CFM @ 90 PSI—enough for a sander and blow gun combo.
Avoid These Time-Killing Mistakes
Even with the best order, these slip-ups add hours:
1. Skipping the blow-out step. Dust from sanding settles into crevices. Without compressed air, you’ll pick it up with your roller. Use a blow gun from the DYNAMIC POWER 50 Pieces Air Tool Kit (ASIN B07FB55B7R)—it includes a blow gun and other useful accessories.

2. Cutting in after rolling. You’ll leave heavy brush marks that don’t blend. Always cut in first.
3. Not letting primer dry fully. Primer feels dry in 30 minutes, but it needs 2+ hours to cure before taping.
4. Using a roller cover with the wrong nap. For smooth walls, use 3/8-inch nap. For textured, 1/2-inch.
5. Forgetting to drain the compressor after use. Moisture in the tank causes rust. Follow our How to Drain Your Air Compressor Tank the Right Way guide.
The Complete Tool List for a Faster Paint Job
| Tool | Purpose | Recommended Product |
|---|---|---|
| Air compressor | Power sanders, blow guns, sprayers | ECOMAX 6 Gal or DEWALT 6 Gal |
| Blow gun | Dust removal | JASTIND or High Volume |
| DA sander | Wall sanding | Part of air tool kit (e.g., DYNAMIC POWER) |
| Paint sprayer | Faster application | HVLP sprayer compatible with compressor |
| Drop cloths | Floor protection | Canvas (plastic slips) |
| Painter’s tape | Masking | FrogTape (green) for crisp lines |
| Brushes & rollers | Cutting in & rolling | Purdy or Wooster |
| Extension pole | Reaching high walls | Telescoping pole |
Expert Insights: Why Pros Use Compressed Air for Painting Prep
I spoke with a professional painter who refinishes 200+ rooms per year. His number one time-saver: using an air compressor to blow out dust before and after sanding. “People think vacuuming is enough, but drywall dust is electrostatically charged—it sticks to walls. A blow gun with 100+ PSI dislodges every particle.”
He also recommends using a catalyzed primer for kitchens and bathrooms, and a pneumatic caulking gun for filling gaps. The air tool kit from DYNAMIC POWER includes a caulking gun adapter.
For those building a home workshop, see How to Build a Workbench in a Weekend and Setting Up Your First Workshop: Tools Every Beginner Needs.
When to Use a Cordless Tire Inflator Instead of a Full Compressor
If you only need to blow out dust after sanding, a portable inflator like the CRAFTSMAN V20 Tire Inflator (ASIN B07JLTMQJT) can serve double duty. It reaches 150 PSI and includes a digital gauge. However, it lacks the volume for continuous sanding.

For occasional light cleaning (one room), a cordless inflator works. For frequent projects, invest in a 6-gallon unit. Compare the Oil-Free vs Oil-Lubricated Air Compressors to decide which type suits your garage.
Step-by-Step: Using an Air Compressor for the First Time
If you’re new to compressed air, follow these steps:
- Check oil level (for lubricated models) or ensure oil-free.
- Plug in and open the drain valve to let moisture escape before use.
- Set the pressure regulator to 90 PSI for most tools.
- Connect the hose—use a 25-foot rubber hose for flexibility.
- Attach your tool (blow gun or sander) with quick-connect fittings.
- Work in sections—don’t let the compressor run continuously.
- Drain the tank after each use. Refer to Common Air Compressor Problems and How to Fix Them Yourself.
Putting It All Together: A Timeline
| Time Block | Task | Tools |
|---|---|---|
| 0:00–0:30 | Clear room, mask, cover floors | Drop cloths, tape |
| 0:30–1:00 | Blow out dust, repair holes, sand | Compressor + blow gun + sander |
| 1:00–1:45 | Prime ceiling and walls | Roller, brush, primer |
| 1:45–2:15 | Cut in ceiling and trim | Angled brush |
| 2:15–3:00 | First coat walls | Roller, extension pole |
| 3:00–5:00 | Let dry (check paint label) | — |
| 5:00–5:45 | Second coat walls | Roller |
| 5:45–6:00 | Remove tape, clean tools | Utility knife, water |
Total time: 6 hours for a 12×12 room. Without a compressor, that takes 8–9 hours.
Final Thoughts: The Order That Saves You Time
The difference between a weekend-long paint job and a smooth day’s work comes down to a simple sequence: clear, repair, blow out, prime, cut in, roll, roll again, clean. Integrate an air compressor into that flow, and you cut the two hardest tasks (sanding and dust removal) by 70%.
Which compressor is right for you?
- Small room / occasional use: CRAFTSMAN 2 Gallon – $129.99, lightweight.
- Medium room / frequent projects: ECOMAX 6 Gallon – $169.99, 4.7-star rating.
- Heavy-duty / multiple rooms: DEWALT 6 Gallon 165 PSI – $204.99, 4.6 stars.
- Cordless convenience: DEWALT 20V Tire Inflator – $130.22, tool only.
Whichever you choose, remember: the order you work saves time, but the right tools save your back. Start with the sequence above, add a compressor, and you’ll never dread painting a room again.
For more on workshop organization, read Pegboard vs Slatwall: Organizing Your Garage Walls and Lighting a Workshop: LED Layouts That Actually Work.