
Squeaky floors are one of the most frustrating household annoyances. You step on that one spot — creeeak — and your peaceful morning coffee turns into a search for the culprit. The good news? You don’t need to rip up your entire floor or call a contractor. With the right tools and a bit of know-how, you can silence those squeaks for good.
Whether you’re working from above (through carpet, hardwood, or tile) or from below (through a basement or crawlspace), this guide covers every method, tool, and trick. We’ll focus heavily on compressors and power tools — because let’s be honest, that’s what makes the job efficient and professional-grade. And we’ll include real, tested products you can buy today to get the job done right.
What Causes a Squeaky Floor?
Before you start swinging a hammer, understand the enemy. Squeaks happen when the subfloor moves against the floor joist, or when two wooden pieces rub together. Nails work loose over time, wood shrinks, and fasteners fail. The result: friction and noise.
Common root causes:
- Loose subfloor panels (plywood or OSB) that aren’t securely fastened to joists
- Dried-out wood creating gaps between the subfloor and joists
- Warped or cupped boards that rub against each other
- Improper nailing during original construction — too few nails or wrong type
- Shifting foundation or settling of the house over time
Identifying whether you can access the floor from below is the first big decision point. That determines which fix you’ll use — and which tools you’ll need.
Fixing Squeaky Floors From Above
If you don’t have access underneath (e.g., a finished ceiling below), you must work from above. This means driving fasteners through the finished floor into the joists below. The challenge? You have to hide the repair.
Tools You’ll Need
- Pneumatic finish nailer (powered by an air compressor) — for hardwood or trim
- Cordless drill/driver — for screws
- Screw finder stud finder — to locate joists
- Squeak-repair screws (special break-away head screws)
- Counterbore bit set — for hiding screw heads in wood floors
- Putty or filler and stain markers
Method 1: The Hidden Screw Trick (For Carpet)
For carpeted floors, you can drive screws right through the carpet into the subfloor. Use screws designed for this — they have a thin head that sinks below the carpet fibers. But you still need to hit the joist.
- Locate the joist with a stud finder (or by tapping for a solid sound).
- Pre-drill a small pilot hole through the carpet and subfloor.
- Drive a squeak-repair screw using a cordless drill. The screw’s special thread pulls the subfloor tight against the joist.
- The top of the screw breaks off below the carpet surface, leaving no visible mark.
Pro tip: Use a drill with adjustable clutch to avoid overdriving and tearing the carpet.
Method 2: Toenailing for Hardwood Floors
Hardwood floors require a delicate touch. You can nail at an angle through the tongue of the board into the joist below — a technique called toenailing. A pneumatic finish nailer connected to an air compressor makes this fast and clean.
For this job, a DEWALT Pancake Air Compressor (6 Gallon, 165 PSI) is perfect. It provides consistent airflow for a 15- or 16-gauge finish nailer.  At $204.99 with a 4.6 rating, it’s a workhorse for any flooring project.
Step-by-step:
- Identify the squeaky board and locate the joist along its length.
- Use a nail set to dimple the hardwood slightly if you need to drive a finishing nail straight down (only for thick hardwood).
- Angle your finish nailer at 45 degrees into the tongue, driving the nail into the joist.
- Fill the small nail hole with wood putty matching the floor finish.
Method 3: Counterbored Screws (For Thick Planks)
For thick plank floors (like 3/4-inch oak), you can drive screws through the face, then plug the hole. Use a counterbore bit to drill a shallow recess for the screw head, drive the screw, and insert a wood plug.
Tools: Cordless drill, a set of sharp drill bits, and a handheld countersink tool. A cordless drill like the CRAFTSMAN V20 Tire Inflator is not needed here — the CRAFTSMAN V20 Air Compressor Portable (model CMCE520B) is actually a tire inflator, not a drill. For drilling, you want a dedicated drill, but the DEWALT Tire Inflator Portable Air Compressor 20V MAX is also an inflator. Stick to a standard drill. We’ll mention the CRAFTSMAN Air Compressor, 2 Gallon Portable as a better fit for powering nailers, not for drilling.
 At $129.99, it’s lightweight and ideal for moving around the house.
Fixing Squeaky Floors From Below
If you have a basement, crawlspace, or garage below the squeaky room, you’re in luck. You can reinforce the subfloor from underneath without touching the finished floor at all. This is the cleanest and most permanent fix.
Tools You’ll Need
- Cordless impact driver or drill
- Screws (3-inch deck screws or specialized subfloor screws)
- Wood shims and construction adhesive
- Pneumatic air stapler or nailer (for adding blocking)
- Safety gear: goggles, dust mask, hearing protection
- Blow gun for cleaning debris
Method 1: Screwing Subfloor to Joists From Below
- In the basement, locate the squeaky area. Have a helper walk above while you listen.
- Measure and mark the joist positions.
- Drill pilot holes through the subfloor into the joist (use a short drill bit to avoid poking through the finished floor above).
- Drive 3-inch deck screws through the subfloor into the joist. Use an impact driver for speed — it has more torque than a regular drill.
A PORTER-CABLE Air Compressor, 6-Gallon, Pancake, Oil-Free can power an impact wrench, but for driving screws, a cordless impact driver is simpler. However, the compressor is excellent for blowing out sawdust and for air tools like staplers. 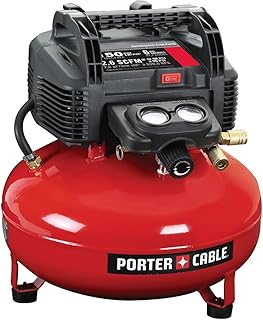 At $164.00 with a 4.6 rating, it’s a reliable choice.
Method 2: Adding Blocking Between Joists
If the subfloor is warped or the joists are spaced too wide, add solid wood blocking. Cut 2×6 or 2×8 lumber to fit snugly between joists, then fasten it with construction adhesive and screws or a pneumatic framing nailer powered by a larger compressor.
For this, the ECOMAX Air Compressor 6 Gallon 150 PSI Pancake offers enough capacity to run framing nailers.  Rated 4.7 stars at $169.99, it’s a top performer.
- Cut blocking to length and apply adhesive to both ends.
- Use a nailer to fasten it to the joist.
- Drive a screw through the block into the subfloor above to pull the subfloor tight.
Method 3: Shimming Gaps
Sometimes the squeak is caused by a gap between the subfloor and the joist. Tap a thin wood shim coated with construction adhesive into the gap. Once dry, trim the excess. This is a low-tech fix that works wonders.
Using Air Compressors for Floor Repair: Why They’re a Game Changer
Air compressors are the backbone of any serious flooring toolkit. They power your nailers, staplers, and cleanup tools. Instead of buying multiple cordless tools, you can run a whole set of pneumatic tools from one compressor. Plus, pneumatic fasteners hold tighter than hand-driven nails.
When choosing a compressor for floor repair, consider these factors:
| Feature | Best for |
|---|---|
| Tank size (1–6 gallons) | Occasional use, small jobs, portability |
| PSI (125–165) | Driving nails into hardwood, adjusting depth |
| Oil-free pump | Low maintenance, good for indoor use |
| Decibel level | Quiet models for indoor work |
For one-room floor repair, a pancake compressor like the DEWALT DWFP55126 or PORTER-CABLE C2002 is perfect. If you need to move around, the CRAFTSMAN 2-Gallon is ultra-portable.
Don’t forget to clean up after cutting shims or drilling. A High Volume Powerful Industrial Air Blow Gun attached to your compressor makes dust disappear. 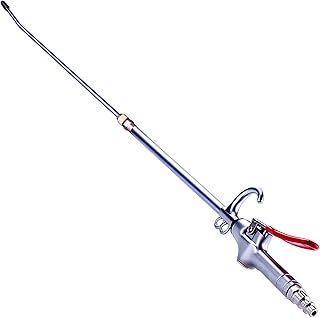 For just $12.99 with a 4.6 rating, it’s a steal.
Specialty Tools That Make the Job Easier
Squeak-Relief Kits
These kits include special screws that break off at the head, along with a driver bit. They work from above through carpet or tile. No air compressor needed, but a drill is essential.
Pneumatic Staplers
For attaching subfloor to joists from above (before laying finished floor), a 15-gauge angle stapler is excellent. Pair it with a compressor like the CRAFTSMAN V20 Cordless Tire Inflator though that’s an inflator — for staplers, you need a tank. The CRAFTSMAN V20 Air Compressor Portable (CMCE521B) is actually a 20V cordless inflator, not a tank compressor. Be careful choosing. For pneumatic staplers, a traditional tank compressor is best.
Cordless Drills and Drivers
While compressors are great for nailers, a cordless drill is still your go-to for driving screws from below. The DEWALT 20V MAX line is popular. For a budget option, the CRAFTSMAN V20 tools work well in the same battery system.
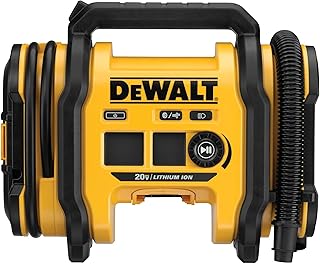
If you only need to inflate tires and run low-air-consumption tools, the DEWALT Tire Inflator Portable Air Compressor 20V MAX (DCC020IB) is a solid 4.6-rated tool at $130.22 — but it’s not a substitute for a tank compressor for sustained nailing.
Blow Guns for Cleaning
After you drill or cut, dust accumulates. A JASTIND Industrial Air Blow Gun with Brass Adjustable Air Flow Nozzle is perfect for blowing out joist cavities before adding adhesive.  At $11.99 and 4.6 rating, it’s a no-brainer.
Step-by-Step: Fixing a Squeaky Floor Using a Compressor and Nailer (From Above)
Let’s walk through a typical scenario: a hardwood floor squeaks over a joist.
- Locate the joist. Use a stud finder or tap the floor. Mark the joist center along the entire length.
- Prepare your compressor. Fill the tank, set the regulator to the nailer’s PSI (usually 70–100 PSI for finish nailers). Use an oil-free compressor like the ECOMAX 6-Gallon for clean air (no oil mist).
- Load the nailer with 16-gauge finish nails (2-inch length is good for 3/4-inch hardwood over 1/2-inch subfloor).
- Position the nailer at a 45-degree angle into the tongue of the board. Press the safety tip against the floor and squeeze the trigger. The compressor refills, and you move to the next spot.
- Repeat every 6 inches along the squeaky section.
- Set the nails slightly below the surface using a nail punch. Fill with putty.
Pro tip: Wear ear protection. The compressor will cycle often, especially the smaller 2-gallon model. For indoor use, consider a quiet compressor.
For more on selecting the right size for your space, read our guide: How to Choose the Right Air Compressor Size for a Home Garage.
Common Mistakes to Avoid
- Using too short of a nail. The nail must penetrate the subfloor and at least 1 inch into the joist.
- Not pre-drilling in hardwood. Even with a nailer, hard oak can bend nails. Pre-drill with a 1/16-inch bit.
- Over-driving screws from below, poking through the finished floor. Always use a stop on your drill bit or use a screw-depth gauge.
- Ignoring the crawlspace safety. If you’re under the house, wear a mask, goggles, and watch for electrical wires and plumbing.
- Failing to clean up dust before adhesive cures. Use a blow gun to remove debris from gaps.
When to Call a Professional
If the squeak persists after multiple attempts, the joist itself may be damaged or the subfloor may need replacement. Similarly, if you have radiant heating pipes or electrical lines in the floor, working from above or below becomes risky. In those cases, a professional flooring contractor with experience using compressors and specialty fasteners is your best bet.
Comparing Fix Methods: Above vs Below
| Method | Difficulty | Tools Required | Visibility | Best For |
|---|---|---|---|---|
| Above – hidden screws | Easy | Drill, squeak screws | None (carpet) | Carpeted floors |
| Above – toenailing | Moderate | Compressor + nailer | Small holes | Hardwood, engineered wood |
| Above – counterbore | Hard | Drill, plugs, cutter | Plugs visible | Thick hardwood, no carpet |
| Below – screwing | Moderate | Drill, screws | None | Full basement access |
| Below – blocking | Moderate | Compressor + nailer, saw | None | Warped subfloor, wide joists |
| Below – shimming | Easy | Shims, glue | None | Small gaps |
Internal Resources to Level Up Your Skills
Fixing squeaky floors is just one of many DIY projects where compressors shine. To get the most out of your equipment, check out these related guides:
- Pancake, Hot Dog, and Twin Stack Compressors Explained – Understand which shape fits your workflow.
- Oil-Free vs Oil-Lubricated Air Compressors: Which One Fits Your Workshop – Make an informed choice before buying.
- Air Compressor Maintenance Schedule: A Monthly Checklist – Keep your compressor running for decades.
- Common Air Compressor Problems and How to Fix Them Yourself – Troubleshoot issues fast.
- Cordless Drill Buying Guide for DIY Homeowners – Pair your compressor with a great drill.
- Setting Up Your First Workshop: Tools Every Beginner Needs – Build a solid toolkit.
- How to Build a Workbench in a Weekend – Create a stable surface for floor repairs.
Product Recommendations at a Glance
| Product | Price | Rating | Best Use |
|---|---|---|---|
| CRAFTSMAN 2-Gallon Air Compressor | $129.99 | 4.0 | Portable nailing for small repairs |
| ECOMAX 6-Gallon Pancake | $169.99 | 4.7 | Versatile, high PSI for most nailers |
| DEWALT 6-Gallon Pancake (165 PSI) | $204.99 | 4.6 | Pro-grade, high capacity |
| PORTER-CABLE 6-Gallon Pancake | $164.00 | 4.6 | Reliable, oil-free, great value |
| DEWALT 20V Cordless Tire Inflator | $130.22 | 4.6 | For inflation only, not nailing |
| CRAFTSMAN V20 Cordless Inflator | $39.00 | 4.6 | Budget tire inflator, tool-only |
| JASTIND Blow Gun | $11.99 | 4.6 | Dust cleanup |
| High Volume Blow Gun (Extensible) | $12.99 | 4.6 | Long-reach dust cleaning |
| DYNAMIC POWER 50-Piece Air Tool Kit | $99.99 | 4.4 | Multi-tool starter set (impact wrench, ratchet, hammer) |
Final Thoughts
Squeaky floors don’t have to drive you crazy. With a quality air compressor and the right accessories, you can fix most squeaks in an afternoon — either from above with a pneumatic nailer, or from below with screws and shims.
Invest in a reliable compressor like the DEWALT Pancake Air Compressor or the ECOMAX 6-Gallon. Add a blower gun and a cordless drill, and you’ll have the power to silence every creak in your home.
Remember, the key to a permanent fix is pulling the subfloor tight against the joist and fastening it securely. Whether you choose to work from above or below, take your time, measure twice, and don’t forget to use ear protection when the compressor kicks on.
Happy repairing — and may your floors stay silent for years to come.