
Neglecting to drain your air compressor tank is one of the fastest ways to shorten its lifespan and compromise your tools. Moisture buildup leads to rust, reduced efficiency, and even dangerous pressure vessel failure. In this guide, you’ll learn exactly how to drain your air compressor tank the right way, which tools make the job easier, and why this simple task matters more than you think.
Whether you own a compact portable unit like the CRAFTSMAN Air Compressor, 2 Gallon Portable or a larger shop model such as the ECOMAX Air Compressor 6 Gallon 150 PSI Pancake, consistent draining is non‑negotiable. Let’s break down the process, the science behind it, and the best practices to keep your compressor running for years.
Why Draining Your Air Compressor Tank Matters
Air compressors work by pulling in ambient air, compressing it, and storing it under high pressure. That ambient air always contains water vapor. When the air is compressed, the vapor condenses into liquid water inside the tank. If left sitting, that water causes:
- Rust and corrosion – Water attacks the steel tank from the inside. Over time, pitting and weak spots develop, which can lead to catastrophic tank rupture.
- Tool damage – Water droplets are forced through your air lines and into your tools, causing stuck valves, rust in air motors, and clogged orifices.
- Reduced efficiency – Water takes up space that should be filled with compressed air. A half‑full tank of water means less usable air volume.
- Contaminated finishes – If you paint or sandblast, moisture in the air stream ruins your work with bubbles, streaks, or clumping media.
According to compressor manufacturers, even “oil‑free” compressors need regular draining. In fact, the PORTER‑CABLE Air Compressor, 6‑Gallon Pancake (C2002‑ECOM) recommends draining after every use. Ignoring this one step can void your warranty.
What Happens If You Never Drain Your Tank?
| Consequence | Effect | Repair Cost |
|---|---|---|
| Internal rust | Thins tank walls, risk of rupture | Tank replacement or new compressor |
| Water in air lines | Tool malfunction, paint defects | Tool repair or replacement |
| Clogged drain valve | Inability to drain at all | Valve replacement ($5‑$20) |
| Bacteria growth | Foul odor in air output | Full cleaning and sanitizing |
A tank that has rusted from the inside may look fine on the outside. Yet a pinhole leak or sudden burst can send metal shards flying. That’s why every safety manual stresses the importance of draining. For more on diagnosing problems early, read our guide on Common Air Compressor Problems and How to Fix Them Yourself.
When Should You Drain Your Air Compressor Tank?
The golden rule: Drain after every use. If you use your compressor daily, make it part of your shutdown routine. If you use it once a week, drain it before you put it away.
However, real‑world conditions affect frequency:
- Humidity – In a damp garage or outdoor worksite, moisture accumulates faster. Drain more often.
- Tank size – Small 2‑gallon tanks like the CRAFTSMAN V20 Cordless Tire Inflator may need draining after each brief use. Larger 6‑gallon or 20‑gallon tanks can hold more condensation, but still need regular draining.
- Temperature changes – Cold nights followed by warm days cause condensation inside the tank even when the compressor isn’t running. Drain before first use of the day.
A good habit: when you finish your last task, walk over and open the drain valve for a few seconds. You’ll hear the air hiss and see water spit out. Close it when only air comes out. That’s it.
For a full preventive schedule, see Air Compressor Maintenance Schedule: A Monthly Checklist.
Step‑by‑Step Guide: How to Drain the Right Way
Step 1: Turn Off the Compressor and Unplug It
Safety first. Make sure the power switch is off and the unit is disconnected from the electrical outlet. For cordless models like the DEWALT 20V MAX Tire Inflator, remove the battery.
Step 2: Release All Air Pressure
Pull the safety relief valve or turn the regulator knob to zero. Let the tank depressurize completely. You can also run a tool briefly to bleed down the pressure. Never attempt to drain while the tank is fully pressurized – the water will shoot out violently and can cause injury.
Step 3: Locate the Drain Valve
Most compressors have a petcock‑style valve at the bottom of the tank. It may be a metal or plastic lever (manual) or a threaded valve for automatic drains. For pancake compressors like the DEWALT Pancake Air Compressor, 6 Gallon (DWFP55126), the drain is usually on the bottom center. Portable units like the CRAFTSMAN 2 Gallon have a small valve underneath.

Step 4: Position a Container
Place a drain pan, old bucket, or rag under the valve to catch water and debris. Expect a mix of clear water and possibly rust‑colored sludge.
Step 5: Open the Valve Slowly
Tilt the valve handle perpendicular to the pipe for a ball valve, or turn counter‑clockwise for a petcock. Open it gradually to control the flow. Water will spurt out first, followed by air. Let it run until only air escapes.
Step 6: Tilt the Compressor (If Necessary)
Some tanks accumulate water in low spots. For horizontal or pancake tanks, tilt the compressor slightly toward the drain valve side to get every drop out. For vertical tanks, the drain is already at the lowest point.
Step 7: Close the Valve Tightly
Once dry air comes out, close the valve by reversing the steps. Ensure it’s snug but not overtightened. A loose valve can leak pressure during operation.
Step 8: Wipe Away Spilled Water
Dry the area around the valve to prevent external rust. For extra protection, you can apply a few drops of compressor oil on the valve stem (after checking your manual).
Types of Drain Valves and How They Work
| Valve Type | Operation | Best For |
|---|---|---|
| Manual petcock | Twist to open | Budget compressors, pancake models |
| Ball valve | 90° lever turn | Larger tanks, easy to install aftermarket |
| Automatic (timer) | Opens periodically | High‑use shops, eliminates forgetfulness |
| Electronic (solenoid) | Opens on power‑off | Industrial setups, no manual effort |
Most homeowner‑grade compressors come with a manual petcock. Upgrading to an automatic drain can save you time if you use your compressor heavily. For guidance on choosing the right compressor type, see Pancake, Hot Dog, and Twin Stack Compressors Explained.
Tools and Accessories That Make Draining Easier
Draining doesn’t have to be a chore. A few simple tools can make the process faster and cleaner.
Blow Guns for Blowing Out Lines
After draining the tank, use an air blow gun to clear any remaining moisture from your hoses. The JASTIND Industrial Air Blow Gun with Brass Adjustable Nozzle is a reliable choice, rated 4.6 stars. Its brass construction resists corrosion, and the adjustable flow lets you control the air stream.
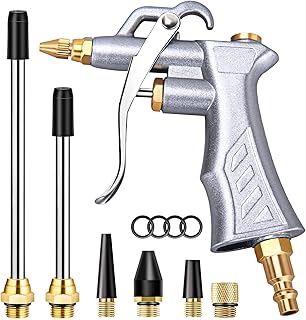
For reaching deep into pipes or equipment, consider an extendible model like the High Volume Powerful Industrial Air Blow Gun (17‑26 inch). Its 360° swivel hook allows you to hang it near your compressor for easy access.
Automatic Drain Kits
If you’re tired of remembering to drain, install an automatic drain valve. Kits are inexpensive (around $20-$40) and mount directly to the tank’s drain port. They open at preset intervals—typically 5–30 minutes—and expel water without your involvement.
Water Separators / Filters
Add a water separator between the compressor and your tools. These catch condensation before it reaches your spray gun or impact wrench. Combined with regular tank draining, they give you dry air for critical jobs.
A Good Set of Air Tools
Investing in quality pneumatic tools encourages you to maintain your compressor. The DYNAMIC POWER 50 Pieces Air Tool Kit includes an impact wrench, ratchet, air hammer, and more. Properly draining your tank ensures these tools stay rust‑free and perform at their best.

Common Mistakes to Avoid
Even experienced DIYers slip up. Here are the most frequent errors:
- Draining while pressurized – Water can explode out, and the sudden release may damage the valve. Always depressurize first.
- Forgetting to drain for weeks – Rust never sleeps. Set a reminder on your phone or use a calendar.
- Using the wrong valve – Some users force a plastic petcock closed too hard and break it. Replacements are cheap; keep a spare.
- Ignoring a stuck valve – If the drain valve won’t open, don’t force it with pliers. Try penetrating oil, or replace the valve.
- Not tilting the tank – Horizontal tanks hold water in the far end. Tilt toward the drain to evacuate fully.
For more troubleshooting, check Why Your Air Compressor Keeps Tripping the Breaker (And What to Do).
Maintenance Beyond Draining
Draining is just one part of compressor care. To extend the life of your equipment:
- Check oil level monthly (oil‑lubricated models). See Oil-Free vs Oil-Lubricated Air Compressors: Which One Fits Your Workshop.
- Replace the air filter every 3-6 months.
- Inspect hoses for cracks and leaks.
- Clean the intake valve to prevent debris from entering the pump.
- Test the safety relief valve annually to ensure it opens at the correct pressure.
A well‑maintained compressor delivers consistent PSI and reduces downtime. For a deeper dive into sizing and selection, read How to Choose the Right Air Compressor Size for a Home Garage.
Drain‑Friendly Compressor Models Worth Considering
If you’re in the market for a new compressor, look for models with easy‑access drain valves and ample tank size. The ECOMAX 6 Gallon 150 PSI Pancake (4.7 stars) has a well‑positioned petcock that’s easy to reach. The PORTER‑CABLE C2002‑ECOM (4.6 stars) is another top seller with a reputation for durability.
For those who prefer cordless convenience, the DEWALT 20V MAX Tire Inflator (DCC020IB) (4.6 stars) doesn’t have a tank, so moisture isn’t stored. But if you need a traditional tank compressor for staplers, nail guns, or blow‑off tasks, invest in one with a large brass drain valve.

Don’t forget accessories: a quality air hose and a CRAFTSMAN V20 Tire Inflator (CMCE520B) (4.4 stars) can handle tire inflation away from the shop, keeping your main compressor’s tank dedicated to dry air for tools.
Final Thoughts
Draining your air compressor tank the right way takes only 30 seconds but saves you hundreds in repairs and replacements. Make it a non‑negotiable part of your workflow. Whether you own a compact CRAFTSMAN 2‑gallon or a heavy‑duty DEWALT 6‑gallon, the principles remain the same: depressurize, open the valve, drain completely, and close it tight.
Pair this habit with routine filter changes, oil checks, and an automatic drain upgrade if you use your compressor daily. Your tools will thank you with consistent performance, and your compressor’s tank will remain free of rust for years to come.
For more workshop wisdom, explore our guides on Setting Up Your First Workshop: Tools Every Beginner Needs and The Best Quiet Air Compressors for Indoor Use. Keep the air flowing, the water out, and your projects moving forward.