
Your detached garage stands separate from the house, often unheated and drafty. A cold garage isn’t just uncomfortable — it wastes energy, damages stored tools, and limits your workshop potential. But insulating it doesn’t have to break the bank. With smart material choices and the right air compressor and power tools, you can transform that freezing space into a usable workshop while keeping costs low.
This guide walks you through every step of insulating a detached garage on a budget, with a focus on compressors and power tools that make the job faster and more professional. We’ll cover material selection, installation techniques, tool recommendations, and cost-saving tips — all backed by real product data you can trust.
Why Insulate Your Detached Garage? (And Why Do It on a Budget?)
A detached garage often lacks the insulation and heating of an attached garage. That means summer heat soaks in, winter cold seeps through, and your air compressor or power tools suffer temperature extremes. Insulation stabilizes the interior temperature, protects your equipment from condensation, and reduces energy costs if you ever add a heater.
Budget insulation is possible because you don’t need premium materials. Fiberglass batts, rigid foam board, and blown-in cellulose all offer excellent value. And with the right compressor and pneumatic tools, you can handle the installation yourself without hiring contractors.
Budget-Friendly Insulation Materials Compared
| Material | R-Value per Inch | Cost per Sq Ft (Est.) | Best For | DIY Difficulty |
|---|---|---|---|---|
| Fiberglass Batts | R-3.2 – R-4.3 | $0.30 – $0.60 | Stud walls, ceiling joists | Easy |
| Rigid Foam Board | R-4.5 – R-6.5 | $0.50 – $1.00 | Concrete walls, rim joists | Moderate |
| Blown-In Cellulose | R-3.5 – R-3.8 | $0.40 – $0.80 | Attics, hard-to-reach cavities | Moderate (needs machine) |
| Spray Foam (DIY kits) | R-6.0 – R-7.0 | $1.00 – $2.00 | Small gaps, rim joists | Moderate |
Fiberglass batts are the cheapest option for standard wood-framed garages. Rigid foam board works well on masonry walls where you can build a furring strip frame. Blown-in cellulose is ideal for attic spaces and can be installed with a rented machine or even an air compressor with a blower attachment.
For the tightest budget, combine fiberglass in walls with rigid foam on the garage door (using reflective foil bubble wrap or 1-inch foam board).
Essential Power Tools and Compressors for the Job
Insulating a garage is a power-tool-heavy project. You’ll need:
- A circular saw or jigsaw for cutting foam board and plywood
- A drill/driver for installing furring strips and fasteners
- A staple gun for securing vapor barriers and batts
- An air compressor with a blow gun or insulation blower attachment for blown-in cellulose
- A utility knife and straightedge for cutting batts
Why an air compressor matters in insulation work: If you choose blown-in cellulose, you can rent a specialized blower, but a large‑capacity pancake compressor paired with an insulation blower attachment (or even a high‑volume blow gun) can work for small attics. Additionally, you’ll use the compressor to clean debris before installing insulation, and to power pneumatic staplers that speed up vapor barrier installation.
Let’s look at the best compressors and tools that fit a budget, using real Amazon products with proven ratings.
Top Air Compressor Picks for Garage Insulation Projects
1. PORTER-CABLE 6‑Gallon Pancake Compressor – $164.00

The PORTER-CABLE C2002-ECOM is a workhorse pancake compressor with 6 gallons of tank capacity and 150 PSI max pressure. It’s oil‑free for low maintenance, and its compact shape makes it easy to move around a garage during insulation work. Rated 4.6 stars, it’s ideal for running a staple gun, blow gun, and even a small insulation blower attachment.
Why it shines for insulation: The 6‑gallon tank gives you enough reserve to drive multiple staples without the motor kicking on constantly. Plus, it’s quiet enough to use indoors without earplugs.
2. ECOMAX 6‑Gallon Pancake Compressor – $169.99
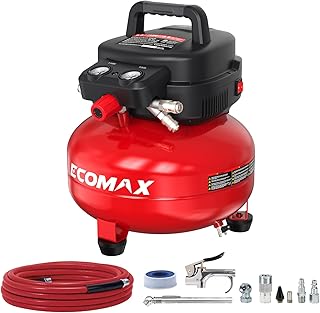
The ECOMAX 6‑Gallon offers a slightly higher rating (4.7 stars) and comes with a 10‑piece accessory kit including a blow gun and tire chuck. At $169.99, it’s a fantastic value for budget-conscious DIYers. Its oil‑free pump and low amp draw (starts on 15‑amp circuits) make it garage‑friendly.
Use it for: Blowing out wall cavities before insulation, powering a pneumatic staple gun for vapor barrier, and inflating tires on your wheelbarrow or equipment.
3. DEWALT 6‑Gallon 165 PSI Pancake Compressor – $204.99

If you want the extra pressure and durability of a DEWALT, the DWFP55126 delivers 165 PSI from a 6‑gallon tank. Rated 4.6 stars, it’s built for heavy daily use. The high pressure allows you to run larger tools like a framing nailer for furring strips, or an air hammer for demolition.
Best for: You plan to use the compressor for more than just insulation — framing, roofing, and future workshop projects.
4. CRAFTSMAN 2‑Gallon Portable Compressor – $129.99

For very tight budgets and light‑duty tasks like operating a blow gun or inflating tires, the CRAFTSMAN 2‑Gallon is a steal at $129.99. It’s compact and includes a 10‑piece accessory kit. Its 125 PSI max is enough for most pneumatic staplers and blow guns used in insulation work.
Note: Because of the small tank, it may struggle with continuous‑use tools like a long‑stroke stapler. Use it for quick bursts — cleaning, fastening vapor barrier, and filling air tools.
5. Cordless Options for Maximum Portability
If you’re working in a garage without power yet, or need to move between attic and walls, cordless inflators can handle light tasks. The CRAFTSMAN V20 Cordless Tire Inflator (CMCE521B) at $39.00 and the DEWALT 20V MAX Tire Inflator (DCC020IB) at $130.22 are great for topping off tires and blowing dust, but you’ll still want a larger compressor for continuous insulation tasks.
Pneumatic Accessories That Speed Up Insulation
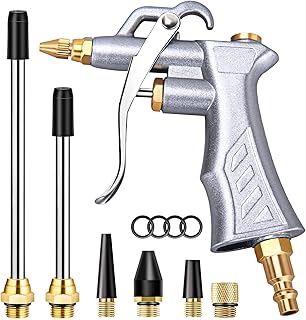
High‑Volume Blow Guns for Cavity Cleaning
Before installing insulation, you must clean dust, cobwebs, and debris from wall cavities. A high‑volume air blow gun connected to your compressor makes this job take minutes instead of hours.
- JASTIND Industrial Air Blow Gun – $11.99, rated 4.6. Includes brass adjustable nozzle and two steel extensions.
- High Volume Powerful Industrial Air Blow Gun – $12.99, rated 4.6. Extensible from 17 to 26 inches with a 360° swivel hook.

50‑Piece Air Tool Kit for Future Projects
If you’re investing in a compressor, consider the DYNAMIC POWER 50‑Piece Air Tool Kit at $99.99 (4.4 stars). It includes an impact wrench, ratchet wrench, air hammer with chisels, and more. While not specific to insulation, the air hammer is perfect for removing old fasteners or breaking up concrete anchors.
Step-by-Step: Insulate Your Detached Garage on a Budget
Step 1: Prepare the Space
Clear everything out of the garage. Remove any old insulation if it’s moldy or rodent‑infested. Use your compressor and blow gun to blast away dust from wall cavities, ceiling joists, and corners. Seal any gaps with caulk or expanding foam.
Internal link: Learn more about sealing leaks with weatherstripping doors and windows.
Step 2: Choose Your Insulation Type and Buy Materials
For walls, fiberglass batts are cheapest. For the ceiling (if you have an attic space above), blown‑in cellulose offers the best R‑value per dollar. For concrete block walls, rigid foam board with a vapor barrier works well.
Pro tip: Measure your wall cavities (standard 16” or 24” on center) and buy batts that friction‑fit. This avoids needing adhesive.
Step 3: Install Vapor Barrier (If Needed)
In cold climates, a vapor barrier (6‑mil polyethylene) goes on the warm side of the insulation (interior facing). Staple it to the studs using a pneumatic staple gun powered by your CRAFTSMAN 2‑Gallon or PORTER‑CABLE 6‑Gallon compressor. Pneumatic staplers are much faster than manual ones and deliver consistent depth.
Step 4: Place Insulation
- For fiberglass batts: Cut with a utility knife using a straightedge. Fit snugly between studs and joists. Use a staple gun to fasten the paper facing to stud flanges.
- For rigid foam board: Cut with a circular saw or utility knife. Attach to concrete walls using construction adhesive and cap screws with washers. Seal seams with foil tape.
- For blown-in cellulose: Rent a machine or use a dedicated blower attachment on your compressor. This is where a larger tank (6‑gallon) like the DEWALT DWFP55126 or ECOMAX 6‑Gallon helps maintain consistent airflow.
Internal link: Understand the differences between Oil-Free vs Oil-Lubricated Air Compressors to know which compressor type suits your climate and usage.
Step 5: Seal and Finish
Cover all insulation with a vapor barrier if not already done. Then install drywall or plywood sheathing. Use a drill/driver to screw panels into studs. If you plan to heat the garage later, consider wiring for a 240V heater — see How to Wire a 240V Outlet in Your Garage.
Budget Breakdown Example
| Item | Cost (Est.) |
|---|---|
| Fiberglass batts R‑13 (walls) – 500 sq ft | $150 |
| Rigid foam board R‑5 (garage door) – 100 sq ft | $60 |
| Vapor barrier 6‑mil (500 sq ft) | $25 |
| Caulk and expanding foam | $20 |
| Compressor rental or purchase | $129 – $205 |
| Air blow gun | $12 |
| Pneumatic stapler (if needed) | $30 |
| Total | $426 – $502 |
If you already own a compressor, you can insulate a 2‑car detached garage for under $300.
Maintaining Your Compressor During and After the Insulation Project
Insulation produces fine dust, especially when cutting fiberglass or blowing cellulose. Protect your compressor by:
- Keeping its intake filter clean — check it after every few hours of use.
- Using the blow gun only with proper eye and lung protection.
- Draining your compressor tank after each session to prevent moisture buildup.
- Storing the compressor in a clean area after the project — don’t leave it in the dusty construction zone.
Internal link: Follow a monthly air compressor maintenance checklist to extend its life.
Additional Power Tools That Make Insulation Easier
- Circular saw – for cutting foam boards and plywood. A cordless saw (same battery platform as your inflator) keeps things simple.
- Drill/driver – essential for screwing furring strips and drywall.
- Utility knife – the most used tool for cutting batts.
- Staple gun – pneumatic or manual.
If you’re building a workbench afterward, check out How to Build a Workbench in a Weekend.
Common Mistakes When Insulating a Garage (and How to Avoid Them)
- Skipping air sealing – gaps let heat escape and pests enter. Use expanding foam around pipes, wires, and rim joists.
- Forgetting the garage door – an uninsulated door is the biggest heat loss source. Add a foam board kit or reflective insulation.
- Not using a vapor barrier in cold climates – moisture can condense inside walls, leading to mold.
- Over‑compressing fiberglass batts – they need full thickness to achieve rated R‑value. Don’t stuff them behind pipes or wires.
- Leaving the compressor in the dust – clean its filter and tank after the job. See How to Drain Your Air Compressor Tank the Right Way.
Final Thoughts: Your Warm Garage Awaits
Insulating a detached garage on a budget is absolutely achievable with careful planning, the right materials, and a reliable air compressor. The tools you buy for this project — like a PORTER‑CABLE 6‑Gallon or ECOMAX 6‑Gallon pancake compressor — will serve you for years after the insulation is done. They’ll power nailers, impact wrenches, and tire inflators for every future garage project.
Start by choosing your insulation type, invest in a compressor that fits your budget and workload, and take the time to seal every gap. In a weekend or two, you’ll have a comfortable, energy‑efficient workshop that protects your power tools and makes winter projects a pleasure.
Ready to buy? The CRAFTSMAN 2‑Gallon compressor is your cheapest entry point. For more power, the DEWALT 6‑Gallon 165 PSI will never let you down. Pair either with a JASTIND blow gun for cleaning, and you’re all set.
Need more guidance on your compressor purchase? Read How to Choose the Right Air Compressor Size for a Home Garage and Pancake, Hot Dog, and Twin Stack Compressors Explained.