
Winter is coming, and your home’s thermal envelope is about to be tested. Every small gap around doors and windows can leak warm air and drain your heating budget. Weatherstripping is the most cost-effective way to stop that leakage, but doing it right requires the right tools—including an air compressor.
A quality air compressor isn’t just for powering nail guns or inflating tires. It also runs pneumatic blow guns that blast away dust and debris before you apply weatherstripping, ensuring a long-lasting seal. When winter winds arrive, you’ll be grateful for airtight doors and windows—and for the compressor that helped you get the job done.
In this deep-dive guide, we’ll cover everything from choosing the best weatherstripping materials to using compressors and pneumatic accessories for professional-grade results. You’ll learn exactly how to prep, measure, cut, and install weatherstripping, plus get product recommendations that make the work faster and easier.
Why Weatherstripping Matters Before Winter
Your home’s heating system works harder when air leaks through gaps around doors and windows. According to the U.S. Department of Energy, drafty homes can lose 25–30% of their heat through gaps and cracks. Weatherstripping is a simple, low-cost fix that pays for itself in one winter.
Beyond energy savings, quality weatherstripping also keeps out moisture, dust, and pests. It reduces condensation on windows, preventing mold and wood rot. A properly sealed home feels more comfortable, with fewer cold drafts and better humidity control.
The best time to install weatherstripping is before temperatures drop below freezing. Most adhesives and tapes cure best in mild weather, and you want everything set before snow and ice arrive. If you wait until January, you’ll be working in uncomfortable cold—and possibly with frozen surfaces that won’t bond properly.
Types of Weatherstripping: Which One Fits Your Home?
Not all weatherstripping is created equal. The material you choose depends on the gap size, location (door vs. window), and how often the surface moves. Below is a breakdown of the most common types.
| Type | Best For | Gap Size | Pros | Cons |
|---|---|---|---|---|
| Foam tape (closed-cell) | Door frames, window sashes | 1/4” or less | Inexpensive, easy to apply, compressible | Can wear out after 1–2 years |
| V-strip (tension seal) | Window channels, door jambs | 1/16” to 1/4” | Durable, allows sliding, very effective | Requires careful alignment |
| Door sweep | Bottom of doors | Up to 1” | Blocks drafts under doors | Needs adjustment for uneven floors |
| Felt | Old windows, seasonal use | 1/4” or less | Cheap, quiet | Low durability, absorbs moisture |
| Reinforced silicone | High-traffic doors | 1/4” to 1/2” | Very durable, flexible | More expensive, harder to install |
| Garage door bottom seal | Garage doors | 1/4” to 1” | Heavy duty, weather resistant | Requires specific T-channel or retainer |
For most interior doors and windows, foam tape or V-strip works well. Exterior doors need tougher materials like reinforced silicone or a door sweep. Garage doors are a separate challenge—you’ll need a thick rubber seal that matches your door’s bottom profile.
Tools You’ll Need for Weatherstripping
The basic tool list is simple: measuring tape, utility knife, scissors, a straightedge, and a caulk gun for adhesive. But if you want professional-quality results, add an air compressor and pneumatic blow gun to your arsenal.
Here’s the full toolkit:
- Utility knife – For cutting foam tape and silicone strips.
- Tape measure – Essential for accurate lengths.
- Straightedge – Ensures clean cuts on V-strip or silicone.
- Caulk gun with exterior-grade caulk – Fills gaps before weatherstripping.
- Air compressor – Powers a blow gun for cleaning surfaces.
- Pneumatic blow gun – Removes dust and cobwebs from cracks.
- Staple gun (optional) – For securing felt or V-strip. A pneumatic staple gun saves time.
- Screwdriver – For adjusting door sweeps or removing old hardware.
Using an air compressor and blow gun is a game-changer. It cleans debris from deep grooves where adhesive must bond. Without this step, dust can prevent weatherstripping from sticking, causing early failure. A High Volume Powerful Industrial Air Blow Gun with an extensible nozzle reaches into narrow gaps.
Step-by-Step Weatherstripping Installation
Follow these steps for a tight, durable seal on every door and window.
1. Inspect and Measure
Start by checking all doors and windows for drafts. Hold a lit incense stick near edges—if the smoke wavers, you have a leak. Measure the length of each gap you need to seal. Write down measurements for door perimeters, window sashes, and door bottoms.
For windows, measure the top, bottom, and sides where the sash meets the frame. For doors, measure the entire perimeter plus the bottom gap.
2. Clean the Surface Thoroughly
This is where your air compressor shines. Remove old weatherstripping and caulk residue. Wipe surfaces with rubbing alcohol or a mild degreaser. Let them dry completely.
Now use your JASTIND Industrial Air Blow Gun attached to a portable compressor like the ECOMAX Air Compressor 6 Gallon. Blow air into every crevice to remove dust, cobwebs, and loose particles. A clean surface is the single most important factor for adhesion.
3. Cut Weatherstripping to Length
Roll out your chosen material. Measure twice, cut once. For foam tape, cut slightly longer than needed—you can trim excess after application. For V-strip, cut exactly to length with a straightedge and utility knife.
4. Apply the Weatherstripping
Peel the backing and press firmly into place. For foam tape, start at one end and smooth as you go. Avoid stretching the tape; it will shrink later and pull away. For V-strip, position the hinge of the V so it compresses against the window sash when closed.
For door bottoms, install a door sweep. Adjust it so it just touches the threshold. Use screws, not adhesive, for a secure hold.
5. Seal Remaining Gaps with Caulk
Small cracks around window frames and door jambs should be filled with exterior-grade caulk. Apply a smooth bead and tool it with a wet finger or a caulk finishing tool. Allow to cure according to manufacturer instructions.
6. Test Your Work
Close the door or window. Check for resistance—if it’s too hard to close, you used too thick a material. If you still feel a draft, add another layer of weatherstripping or adjust the door sweep. Use the incense stick test again.
Choosing the Right Air Compressor for Weatherstripping and Workshop Tasks
For weatherstripping, you don’t need a massive compressor. A small, portable unit with 1–6 gallons of tank capacity is ideal. It provides enough air volume for blow guns, staple guns, and even brad nailers if you’re adding trim.
Consider these top-rated models:

CRAFTSMAN Air Compressor, 2 Gallon – $129.99, 4.0 rating. Lightweight at only 34 lbs, 125 PSI max, oil-free pump. Includes a 10-piece accessory kit with a tire inflator and blow gun. Perfect for small weatherstripping jobs and inflating car tires. The compact size means it fits under a bench or in a closet.
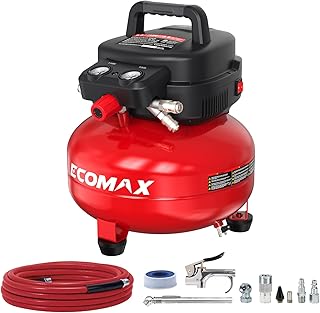
ECOMAX Air Compressor 6 Gallon – $169.99, 4.7 rating. Pancake-style tank, 150 PSI, oil-free, and very quiet (68 dB). Comes with 10 accessories including a blow gun. This is the sweet spot for home DIYers—enough capacity for running a pneumatic staple gun for weatherstripping and other workshop tasks.
If you already own a 20V cordless platform, the CRAFTSMAN V20 Air Compressor Portable, Cordless Tire Inflator ($39, 4.6 rating) is handy for topping off tires but not powerful enough for blow guns. For that, stick with a corded compressor.
For heavy-duty use, the PORTER-CABLE Air Compressor 6-Gallon, Pancake ($164, 4.6 rating) is a trusted workhorse. It delivers 6.0 SCFM at 90 PSI, enough to run multiple tools.

DEWALT Pancake Air Compressor, 6 Gallon, 165 PSI – $204.99, 4.6 rating. High maximum pressure, oil-free pump, and low amp draw (8 A) means it runs on standard 15A circuits. The high pressure helps when using blow guns with long hose runs.
Pro tip: If you’re new to compressors, read our guide on Pancake, Hot Dog, and Twin Stack Compressors Explained. Understanding the differences helps you choose the right tank shape for portability vs. stability.
Pneumatic Blow Guns: Essential for Weatherstripping Prep
You can clean surfaces by hand with a cloth, but compressed air reaches into cracks where dust hides. A blow gun with an adjustable nozzle is especially useful.
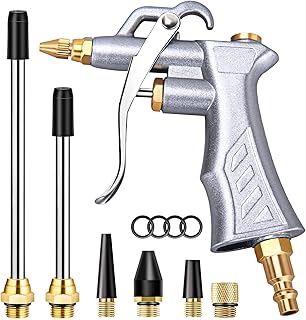
JASTIND Industrial Air Blow Gun – $11.99, 4.6 rating. Features a brass adjustable air flow nozzle and two steel extensions. The brass nozzle resists corrosion, and the extensions get into tight spots like window tracks.

High Volume Powerful Industrial Air Blow Gun – $12.99, 4.6 rating. Extends from 17 to 26 inches with a stainless steel nozzle. The 360-degree swivel hook lets you hang it from a belt or tool hook. Ideal for blowing out overhead window tracks.
Both blow guns connect to any standard 1/4” NPT air fitting. Use them with a compressor like the ECOMAX 6 Gallon for maximum air volume.
For a complete start, the DYNAMIC POWER 50 Pieces Air Tool Kit ($99.99, 4.4 rating) includes a blow gun, impact wrench, ratchet, air hammer, and chisels. While some tools aren’t needed for weatherstripping, the kit gives you everything to maintain your compressor setup.
Compressor Maintenance Before Winter Storage
If you’ll store your compressor in an unheated garage, winter prep is crucial. Water vapor condenses inside the tank and can freeze, damaging seals. Follow these steps:
- Drain the tank after each use. Open the drain valve at the bottom. Let all moisture escape. If you skip this, rust forms inside the tank.
- Check the oil (if oil-lubricated). Change it before storing. For oil-free models like the ones listed above, no oil change is needed.
- Inspect the air filter. A dirty filter restricts airflow and causes overheating.
- Store in a dry location. If possible, bring the compressor inside a heated space. If not, cover it with a tarp to protect from dust.
For a detailed monthly plan, see Air Compressor Maintenance Schedule: A Monthly Checklist. This covers everything from valve checks to belt tension.
Common Weatherstripping Mistakes and How to Avoid Them
Even with the best tools, mistakes happen. Here are the most frequent errors and their fixes.
Using the Wrong Material for the Gap
If your door gap is 3/8 inch, don’t use 1/4-inch foam tape. It won’t compress enough. Use a thicker silicone or a door sweep. Measure the gap with a coin or a feeler gauge first.
Applying Weatherstripping to a Dirty Surface
Dust and grease prevent adhesion. Always clean with rubbing alcohol and let dry. Then use your air blow gun to blow out the crevices. This step alone can double the lifespan of your weatherstripping.
Stretching Foam Tape During Installation
If you stretch the tape while pressing it down, it will relax later and pull away from the frame. Apply it without tension, then press firmly.
Forgetting to Test Before Finalizing
Close the door or window after installing a small section. If it doesn’t seal, adjust immediately. Don’t install the whole roll and then discover it’s too thick.
Ignoring the Door Threshold
Most people weatherstrip the sides and top but forget the bottom gap. A door sweep or threshold seal is essential. If your door has a gap larger than 1/2 inch, consider adding a new threshold.
Integrating Power Tools into Your Winterization Routine
Weatherstripping is just one part of winterizing your home. A compressor and pneumatic tools also help with:
- Caulking – Use a pneumatic caulking gun for fast, even beads.
- Stapling insulation – Staple plastic sheeting over windows with a pneumatic stapler.
- Inflating tires – Keep your car tires at proper pressure for winter traction. The DEWALT Tire Inflator Portable Air Compressor 20V MAX ($130.22, 4.6 rating) is cordless and works with DEWALT 20V batteries. It has automatic shut-off, so you set the target pressure and let it run.
Or, the CRAFTSMAN V20 Tire Inflator ($49, 4.4 rating) offers three power options: 120V corded, 12V car adapter, and cordless with a CRAFTSMAN V20 battery (sold separately). It’s versatile for home and car.
If you’re setting up a dedicated workshop for winter projects, read Setting Up Your First Workshop: Tools Every Beginner Needs. You’ll learn which power tools give the most value for home maintenance.
When to Call a Professional vs. DIY Weatherstripping
Most weatherstripping projects are DIY-friendly. If you can use a tape measure and a utility knife, you can install foam tape or V-strip. However, some scenarios require a pro:
- Double-hung windows with broken balances – The window might not seal properly even with new weatherstripping.
- Rotted door frames – Weatherstripping won’t fix structural rot. Replace the wood first.
- Uneven thresholds – A door sweep might not suffice. A carpenter can adjust the threshold height.
If your home has old, original windows with weighted sash cords, consider hiring a restoration specialist. These windows are tricky to weatherstrip without damaging the historic appearance.
For standard modern doors and windows, DIY is absolutely doable. With a good air compressor and blow gun, you’ll achieve results that rival professional installation.
Maintaining Your Weatherstripping Throughout Winter
After installation, inspect your seals monthly. Cold weather can cause some materials to contract or become brittle.
- Check for gaps after the first hard freeze.
- Clean foam tape gently with a damp cloth if it picks up dirt.
- Re-adjust door sweeps if they drag or lift away from the threshold.
- Replace any sections that peel away or crack.
If you live in an area with extreme temperature swings, consider upgrading to reinforced silicone or a magnetic weatherstripping system for exterior doors. These are more expensive but last for years.
Final Thoughts: Seal the Deal Before Winter Hits
Weatherstripping doors and windows is one of the highest-ROI home improvement projects you can tackle. It saves money, increases comfort, and protects your home from moisture damage. By using an air compressor to clean surfaces thoroughly, you ensure a bond that lasts all winter.
Whether you choose a lightweight CRAFTSMAN 2-Gallon Air Compressor or a versatile ECOMAX 6-Gallon Pancake Compressor, you’ll find countless uses beyond weatherstripping—from inflating car tires to blowing out dust in your workshop.
Now is the time to act. Grab your measuring tape, choose your weatherstripping material, and fire up your compressor. Your winter energy bill—and your comfort—will thank you.
Related Articles:
- How to Choose the Right Air Compressor Size for a Home Garage
- Oil-Free vs Oil-Lubricated Air Compressors: Which One Fits Your Workshop
- The Best Quiet Air Compressors for Indoor Use
- How to Drain Your Air Compressor Tank the Right Way
- Insulating a Detached Garage on a Budget
- Cordless vs Corded Tools: Where Each One Still Wins
- How to Patch Drywall Like a Professional